on
Encrypted DNS for your network with DNSCrypt and PiHole
Encryption for you, encryption for you, encryption for everybody!
In the UK, a vast majority (95%) of domestic internet is provided by the “Big Four” (BT, Virgin, Sky, TalkTalk) Internet Service Providers (ISPs). That’s an awful lot of packets to be shipping around, and the ISPs seem to agree, especially when we’re talking about traffic crossing the Atlantic delivering us some Netflix/Facebook/Youtube goodness to binge from on a Sunday evening. In the same way we pay money to ISPs to provide us with internet, ISPs too have to pay to use the Tier 1 networks that tie the world together. To save on these costs, it’s effective for an ISP to utilise content distribution network (CDN) mirrors which serve up pages from a cache nearer to your geographic location, rather than serving content from the other side of the planet. When you go to youtube via a domestic ISP, chances are you’re being served content from a local CDN.
“Well, that’s cool I guess, if it means pages are served faster. How does it work? “
Through the magic of the Domain Name System (DNS). When you try to browse to say, https://google.com, you’re asking your computer to reach out to DNS server and ask “I’m looking for this site, could you tell me its IP address please?”. By default your home router will act as your DNS ‘source of truth’, which will in turn ask up-stream if it doesn’t already have the answer, and so forth. The routers provided by domestic ISPs by default point up-stream to DNS servers that they own, and in some cases can’t be changed (BT!). This effectively means that your ISP controls the phonebook you use to find any resource on the internet. Through this, they can ultimately decide where to direct you when you look for content, and make a record that you were looking for that content in the first place.
Aha, I hear you saying! “but I’ve already switched my computer’s DNS away from my ISP DNS! I’m safe as pie! 8.8.8.8 fo’ life! And besides, not even my ISP can see what I’m browsing when I’m using HTTPS”
Ah, if only life were that simple.
Switching DNS providers would be an easy way to subvert restrictions on copyright infringing material that ISPs are legally ordered to block by the High Court, and surprisingly enough ISPs are savvy to this. Whilst HTTPS traffic is encrypted, DNS traffic (on port 53) is not. DNS has remained relatively untouched since its inception in 1985 and has lagged behind the curve when it comes to privacy (although they did take a stab at it with DNSSEC). The fact that DNS traffic moves around in plaintext makes it trivial for ISPs to soak up traffic bound for port 53 when destined (for example) to Google’s DNS servers and replace the response to point to their own destination. Additionally, although the content of the sites you browse may use HTTPS, the fact that you visited that site is completely transparent to any snooping party.
I recently setup my home DNS server to encrypt all outbound DNS requests from my LAN. This traffic is in fact completely indistinguishable from web traffic, as it too all happens over port 443. Hopefully this post can serve as a tutorial for anyone who wishes to do this themselves!
The two technologies which allow this to happen are:
- Pihole - A DNS server which provides a “blackhole” for ad domains, and also comes equipped with a gorgeous user interface for configuration. Typically you would install and host this on a Raspberry Pi, although I’m running mine in a Proxmox virtual container without issue (more posts to come in the future regarding Proxmox!). PiHole uses dnsmasq behind the scenes for handling DNS requests and caching.
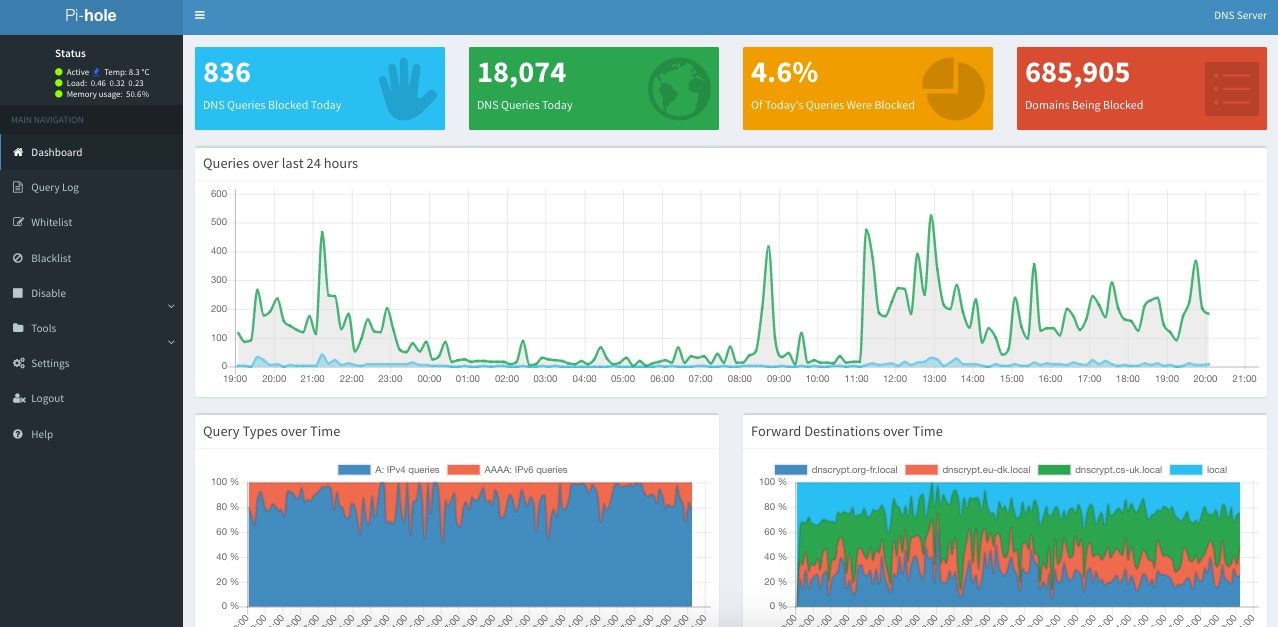
Here’s the beans of the PiHole web interface:
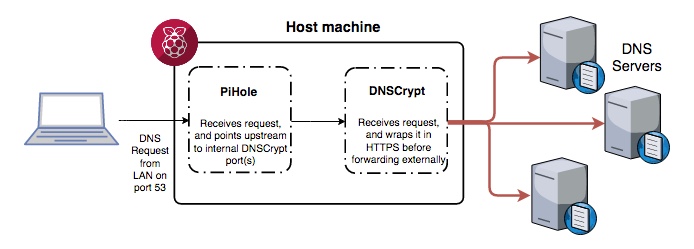
- DNSCrypt - A DNS server which wraps DNS requests in a warm blanket of encryptiony-goodness before sending them out to the interwebs. The upstream servers required by DNSCrypt are not typical DNS servers - they must also be running DNSCrypt. DNSCrypt can be set to enforce PFS (Perfect Forward Secrecy) aka the ephemeral flag, which means that should your encryption keys be discovered they cannot be used retrospectively to decrypt other requests.
The end goal is to have PiHole look to DNSCrypt as its upstream provider for DNS requests. DNSCrypt will then transparently act as an interface for sending and retrieving encrypted DNS requests. The beauty of this solution is that it takes minimal configuration on both ends, and PiHole still handles ad-blocking and DNS caching.
I’ve had this setup working on my local network for the last few months and it has performed absolutely beautifully.
PiHole also comes with built-in functionality to act as a DHCP server. By running PiHole as your LAN’s primary DHCP server it will also distribute to clients which DNS server to point to. This means any phone, laptop, or computer on your lan will by default be using add-blocking encrypted DNS without any configuration required. Win!
So let’s get started.
You’ll need a place to host your super-duper-mega-safe-encryption-dns-machineamatron.
If you’ve got a Raspberry Pi sat dormant under your bed (c’mon, I know you do, everyone does somewhere) then now’s the perfect time to dust it off and take a step towards a safer browsing experience.
If you don’t have a Raspberry Pi, you could look at signing up for an Amazon Web Services account and enjoying the free-tier (1 year) and spinning up an EC2 t2.micro instance. Although - be mindful that anyone will have access to your DNS server unless you put in some extra time locking it down.
For simplicity I’m going to assume you went with the former and are by now sat clutching your Pi in eager anticipation.
Installation of PiHole
Make sure you already have your Pi up and running with root access.
curl -sSL https://install.pi-hole.net | bash
If you are of a suspicious nature (you’re reading this, of course you are) then feel free to inspect the script before piping it straight out into bash and running it.
PiHole will install and start running a lighttpd server on port 80, with the content being hosted sat at /var/www/html should you wish to make any tweaks.
Installation of DNSCrypt
To install DNSCrypt, simply run a
sudo apt-get install dnscrypt-proxy
If you don’t have dnscrypt-proxy in your repository list, you can download the zip file/binary directly here.
DNSCrypt uses a CSV file to find upstream DNS servers it can choose from. By default this CSV file can be found at /usr/local/share/dnscrypt-proxy/dnscrypt-resolvers.csv and should come prepopulated. An up-to-date list can he found here. Take note of the Name field, we’ll be needing it shortly.
Setting up DNSCrypt
To start DNSCrypt you need to specify a local address and port for it to listen on. When someone mentions localhost to you, you most likely think of 127.0.0.1. However any 127.x.x.x address will still resolve to your local machine. Let’s make use of this:
/usr/local/sbin/dnscrypt-proxy -d --resolver-name=cs-uk --user=dnscrypt --local-address=127.10.10.1:11153
Breaking down this command:
-dmeans run in the background as a daemon--resolver-nameis from the name field of the CSV table, and tells DNSCrypt where to point upstream to. In this case, it’s referring to thecs-ukupstream endpoint.--useris the user we want to run the server as. It’s never a good idea to run a service as root!--local-addressis where we will be able to find the internal listening endpoint for our tunnel.
Lets throw a few of these together and run multiple listeners, each one pointing to a different upstream:
/usr/local/sbin/dnscrypt-proxy -d --resolver-name=dnscrypt.eu-dk --user=dnscrypt --local-address=127.10.10.2:11253
/usr/local/sbin/dnscrypt-proxy -d --resolver-name=dnscrypt.org-fr --user=dnscrypt --local-address=127.10.10.3:11353
Notice that the 127.10.10.x address and port number are different each time. Change these to however you feel, as long as they are unique it should be fine.
We now have three DNSCrypt daemons running, one pointing to a DNS server in the UK, one to a server in France, and another to a server in Germany. Let’s give one a test and make sure we’re getting a response:
dig google.com @127.10.10.1 -p 11153 +short
64.233.167.101
64.233.167.138
64.233.167.139
64.233.167.113
If all goes to plan, you should be receiving a list of IPs which have been delivered via an encrypted tunnel!
Set your one-line daemons to run on boot. You can achieve this one of many ways, however I find it sufficient to throw each line into /etc/rc.local which is enough to kick the processes off.
## Point PiHole to use your encrypted DNS tunnels
Start by setting the PiHole web login password through the terminal on your Pi:
pihole -a -p supersecretpassword
Login to the PiHole web interface by accessing your Pi in a web browser at its local LAN ip address. You will be prompted to login. Use the username admin and whatever password you specified previously.
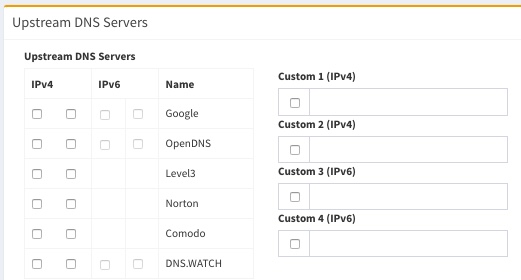
Navigate to Settings and find Upstream DNS Servers. Untick and blank out all fields - we don’t want to use standard DNS addresses. Where we’re going, we don’t need roads! Save the settings.
The next part of the setup will require the command line. The PiHole Web interface doesn’t anticipate that we will want to use an upstream DNS provider on a nonstandard port, so we need to work around that.
The first step is to modify your /etc/resolv.conf file to point to the local machine as its own DNS server. It sounds a bit cyclic, but as PiHole is working as a DNS server it can also provide DNS for itself:
nameserver 127.0.0.1
Next, navigate to /etc/dnsmasq.d and have a look around:
01-pihole.conf 02-pihole-dhcp.conf 04-pihole-static-dhcp.conf README
PiHole has already created a few DNSMasq configuration files (don’t forget, DNSMasq is what is actually doing the legwork of DNS for PiHole). Create a new configuration file called 05-dnscrypt.conf and inside it put the following:
server=127.10.10.1#11153
server=127.10.10.2#11253
server=127.10.10.3#11353
Here we are telling DNSMasq where to look for the three tunnels we created earlier using DNSCrypt (what we would normally want to enter via the web interface if we weren’t using DNSCrypt).
To allow the web gui to show more meaningful names against each upstream server, append the following to your /etc/hosts file:
# DNSCrypt Proxies running on this machine
127.10.10.1 dnscrypt.cs-uk.local
127.10.10.2 dnscrypt.eu-dk.local
127.10.10.3 dnscrypt.org-fr.local
This should make for friendlier and more meaningful graphs on the web interface.
At this point you should be safe to restart your Pi. You can now point your router to use your PiHole as its upstream DNS provider. When clients request an address from your router it will now ask your PiHole, which in turn will ask DNSCrypt, which will then encrypt your request before it leaves your network!
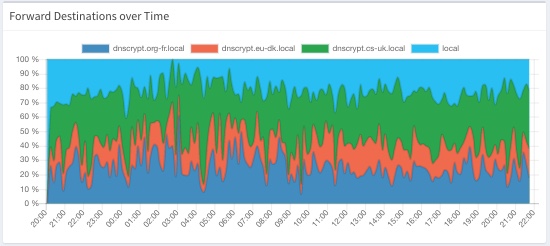
These three endpoints compose all of the external DNS traffic leaving my lan, with local caching averaging around 20-30% of all DNS requests. These cached requests never need to leave the network and save around 20-50ms per request. Faster browsing never felt so good ;)
I hope this guide proves informative. It was definitely a fun weekend project and I’d fully recommend it if you have a spare Pi laying around!